Chào các bạn,
Lâu lắm mới quay lại viết blog cho Laravel :D, dạo này cũng chả biết viết gì thêm :v
Nay mình sẽ share các bạn mô hình HMVC và cách dựng HMVC trên Laravel 5 nhé.
1/ HMVC là gì?
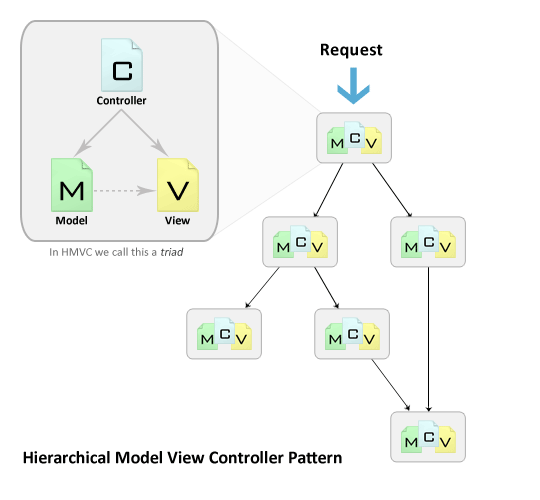
HMVC là viết tắt của Hierarchical model–view–controller, là một mô hình cải tiến hơn từ MVC trở lên.
Lợi thế chính mà HMVC đem lại cho mình là:
- Modularization.
- Organization.
- Reusability.
- Extendibility.
Diagram cho dễ hình dung nè:
Nếu ta search với từ khóa HMVC, thì kết quả nhiều nhất sẽ hiện ra là dành cho CodeIgniter, bởi vì độ đơn giản của của nó.
Tuy nhiên, cách mà ta sẽ apply HMVC vào Laravel 5 cũng dễ ko kém, qua phần sau nhé 😀
2/ Apply HMVC cho Laravel 5
Trước tiên đi từng phần, thì mình đã làm 1 project sample như sau: https://github.com/sethsandaru/laravel-hmvc-sample
Code tham khảo thì các bạn có thể clone repo ở trên về 😀
Về cơ bản, mình lợi dụng vào Package Development của Laravel để có thể đạt được điều mà mình mong muốn (HMVC).
2.1/ Định hình structure cho project
Đối với HMVC, ta sẽ luôn có một MVC Base, và từ đó mới xuống dần MVC module (con), như sau:
- Base MVC
- Module 1 – MVC
- Module 2 – MVC
- …
- Module n – MVC
Vậy nên theo thư mục, mình sẽ phân chia như sau:
- app (base MVC)
- app/Modules (Modules MVC)
Xong bước đầu, ta tiếp tục qua bước sau.
2.2/ Định hình structure MVC của Module
Không chỉ có MVC, ta cũng cần có những thứ cần thiết để hỗ trợ cho việc code thuận tiện, vậy nên đã làm thì làm cho full luôn 😀
Trong MVC module, sẽ như sau:
- Module
- Configs: sẽ chứa những file config (format theo Laravel).
- Controllers: chứa class Controllers.
- Language: chứa các file language của Laravel (localization), follow theo format của Laravel.
- Libraries: chứa những class Library.
- Migrations: chứa schema migration, follow theo format của Laravel.
- Models: chứa models dùng trong module này.
- Views: chứa các file views.
- routes.php: Các route sẽ sử dụng trong module này
Nhìn sơ qua thì khá là đầy đủ nhỉ? :D. Chỉ thiếu duy nhất 1 cái là helper function mà chắc nó cũng ko tới nỗi đâu 😀
2.3/ Tạo ServiceProvide để boot HMVC
Tạo ra 1 class có tên là HMVCServiceProvider tại app/Modules, extend ServiceProvider.
Class này sẽ hỗ trợ chúng ta boot HMVC của chúng ta lên thông qua method boot:
Full file: https://github.com/sethsandaru/laravel-hmvc-sample/blob/master/app/Modules/HMVCServiceProvider.php
/**
     * Perform post-registration booting of services.
     */
    public function boot()
    {
        $directories = array_map('basename', File::directories(__DIR__));
        foreach ($directories as $moduleName) {
            $this->_registerModule($moduleName);
        }
    }
    private function _registerModule($moduleName) {
        $modulePath = __DIR__ . "/$moduleName/";
        // boot route
        if (File::exists($modulePath . "routes.php")) {
            $this->loadRoutesFrom($modulePath . "routes.php");
        }
        // boot migration
        if (File::exists($modulePath . "Migrations")) {
            $this->loadMigrationsFrom($modulePath . "Migrations");
        }
        // boot languages
        if (File::exists($modulePath . "Languages")) {
            $this->loadTranslationsFrom($modulePath . "Languages", $moduleName);
        }
        // boot views
        if (File::exists($modulePath . "Views")) {
            $this->loadViewsFrom($modulePath . "Views", $moduleName);
        }
    }
Save file lại, mở file config/app.php, tại providers, ta khai báo class này ở cuối array, and you’re good to go 😀
'providers' => [
    ...
    /// Register our HMVC
    App\Modules\HMVCServiceProvider::class,
]
2.4/ Khởi tạo module đầu tiên: Home
Sau khi ta định hình được tổng quan structure rồi, tiến hành thôi 😀
Tạo ra folder app/Modules.
Tiếp đến tạo folder Home (tên module) trong app/Modules.
Tùy theo nhu cầu sử dụng, ta sẽ tạo ra các folder cần thiết bên trong Home (Controllers, Views,…) theo ý của chúng ta.
2.5/ Khai báo routes (optional)
Nếu các bạn có sử dụng route và tạo ra file routes.php, khai báo route như sau (cũng same như web.php thui):
<?php
/**
 * Route for Home modules
 * Declare route normally like all other 😀
 * For most case, your module name will be the parent path (Ex: /home/abc, /home/xxxx)
 */

$module_namespace = "App\Modules\Home\Controllers";

Route::prefix('/home')->namespace($module_namespace)->group(function () {
    Route::get('/index', "Home@index");
    Route::get('/view', "Home@view");
    Route::get('/test_insert_model', "Home@test_insert_model");
    Route::get('/get_model', "Home@get_model");
});
Bạn nên đặt ra 1 rule nhất định khi define route cho 1 module, ví dụ theo mình, Module Home sẽ luôn bắt đầu bằng /home, vậy nên mình sẽ group nó lại luôn.
Nếu module bạn ko cần route, bạn có thể bỏ qua bước này 😀
2.6/ Tạo ra những file cần thiết cho công việc
Cụ thể ở đây, mình cần 1 Controller, 1 View, 1 Model, ok tiến hành tạo bình thường thoy.
Với Controller, Model thì ta vẫn tạo ra bình thường. Với Controller, extend lại Controller trong app\Http. Còn Model, các bạn xài eloquent thì extend lại Model bình thường.
Tuy nhiên đối với views, mình sẽ tạo thêm folder để ta dễ quản lý view, đặt tên folder theo controller, như sau (Ví dụ mình có controller là Home):
- views
- home
- index.blade.php
- abc.blade.php
- …
- home
Đại loại vậy 😀
Thì như vậy, ta đã có một module cơ bản cho project của chúng ta 😀
3/ Laravel Loader
3.1/ Load view
Để load view, ta cần sử dụng alias để Laravel nó hiểu module của chúng ta. Theo như bước boot ở trên ServiceProvider, alias module sẽ là tên folder của module. Các bạn sẽ load view như sau:
return view('Home::home.view', $arrData);3.2/ Load translation text (language text)
Chúng ta cũng thông qua alias để get, như sau:
trans('Home::home.hello'); // Hello3.3/ Load config
Config thì nó hơi đặc biệt 1 chút, để tạo ra 1 config cho module, các bạn cần:
- Tạo file config trong app/Modules/<module_name>/Configs. Follow theo chuẩn của Laravel.
- Mở file HMVCServiceProvider.php, các bạn sẽ thấy property là $configFile.
- Register config file của bạn như sau: (config_alias => config_file_location)
private $configFile = [
    // alias => config file location/path
    'homeconfig' => 'Home/Configs/homeconfig.php',

    // more here
];
Và để get config item, ta sẽ sử dụng hàm config như bình thường:
config('homeconfig.text'); // get 'text' in homeconfig4/ Migrations
Về migrations, flow của nó chạy sẽ như sau khi ta sử dụng lệnh php artisan migrate:
- Base/Core Migrations (trong database/migrations)
- Through each module:
- Module 1
- Module 2
- …
Tạo migrations
Đơn giản là ta cứ tạo trong thư mục Migrations trong Module folder.
Lưu ý: file name + class name follow theo migration của Laravel nhé, chứ ko nó ko hiểu đâu.
5/ Kết luận về HMVC cho Laravel 5
Với bài viết này, có thể các bạn biết được hơn chút về cách xây dựng HMVC cho Laravel 5.
Tuy nhiên mình cũng có một bật mí nhỏ là, đây ko hẳn là fully HMVC cho Laravel 5 cho lắm, chỉ là ta tận dụng cái lợi thế Modular của HMVC ra để apply, module hóa Laravel 5 thui. Chứ bản chất Laravel là nó ko có dựng fully HMVC được.
Nhưng lợi thế nó đem lại cho chúng ta khá là nhiều, nhất là đối với các project lớn 😀
Về code tham khảo, visit link GitHub của mình ở trên nhé, full example code 😀
Cám ơn các bạn đã quan tâm theo dõi!
# HMVC cho Laravel 5
# Dựng mô hình HMVC cho Laravel 5